Day 22: A Step-by-Step Guide to Setting up Jenkins on an AWS EC2 Ubuntu
Hello Learners,
This is the #Day22 of my #90DaysOfDevopsChallenge initiated by Shubham Londhe . In this blog, we will learn how to start with Jenkins World. If you are new to the DevOps or Jenkins world, I promise you gonna rock it.
Introduction:
Jenkins is a tool that is used for automation, and it is an open-source server that allows all the developers to build, test and deploy software. It works or runs on Java as it is written in Java. By using Jenkins we can make a continuous integration of projects(jobs) or end-to-endpoint automation.
Jenkins achieves Continuous Integration with the help of plugins. Plugins allow the integration of Various DevOps stages. If you want to integrate a particular tool, you need to install the plugins for that tool. For example Git, Maven 2 project, Amazon EC2, HTML publisher etc.
By leveraging the power of AWS EC2 instances, you can easily set up Jenkins to automate your development workflows. In this blog post, we will walk you through the step-by-step process of setting up Jenkins on an AWS EC2 Ubuntu instance.
Prerequisites: Before we begin, ensure that you have the following prerequisites in place:
An AWS account with access to the EC2 service.
A running EC2 Ubuntu instance with SSH access. (In my case on Windows CMD)
A basic understanding of Linux commands and AWS services.
Step 1: Launch an EC2 Ubuntu Instance
Log in to your AWS Management Console.
Navigate to the EC2 service and click on "Launch Instance."
Select an Ubuntu Server AMI (Amazon Machine Image) and choose the instance type that suits your requirements, here I am using the free tier.
Configure the instance details, such as the number of instances, network settings, and storage.
Review the instance details and click on "Launch."
Choose an existing key pair or create a new one to securely connect to your instance via SSH.
Step 2: Connect to the EC2 Instance
Once the instance is launched, note down or copy the Public IP or DNS of the instance.
Open a terminal or command prompt on your local machine and use the SSH command to connect to the instance. In my case, I used CMD where the key-pair value is downloaded.

Step 3: Install Java
  sudo apt update
  sudo apt install openjdk-11-jre
  java --version
Update the package lists on the EC2 instance:

Install Java Development Kit (JDK) using the following command:

Check whether Java is installed or not.

If your output looks like this, you are good to go.
Step 4: Install Jenkins:
Curl, Update the package lists again and install Jenkins.
This is a bash command one can use. For more reference:
https://www.jenkins.io/doc/book/installing/linux/
 curl -fsSL https://pkg.jenkins.io/debian/jenkins.io-2023.key | sudo tee /usr/share/keyrings/jenkins-keyring.asc > /dev/null
 echo deb [signed-by=/usr/share/keyrings/jenkins-keyring.asc] https://pkg.jenkins.io/debian binary/ | sudo tee /etc/apt/sources.list.d/jenkins.list > /dev/null
 sudo apt-get update
 sudo apt-get install jenkins
Step 5: Configure Jenkins
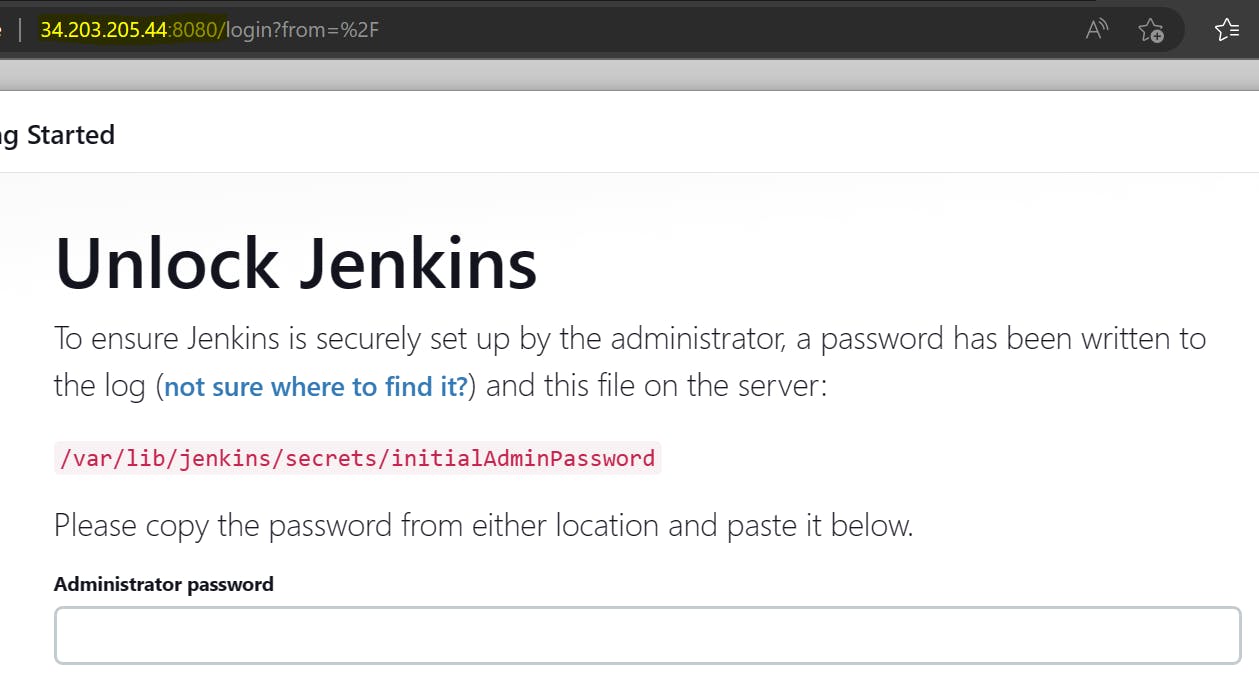
Open a web browser and navigate to
http://<your-instance-public-ip>:8080As demonstrated in below highlighted area
Retrieve the Jenkins initial administrator password using the following command on the EC2 instance:
sudo cat /var/lib/jenkins/secrets/initialAdminPassword

Copy the password and paste it into the Jenkins web interface as the Administrator password as shown in the above screenshot.
Follow the on-screen instructions to complete the setup wizard.

Install suggested plugins or choose specific plugins based on your requirements, the following window will populate.

Step 6: Access Jenkins
Create an administrative user account for Jenkins or continue as an admin.
Customize your Jenkins installation or use the default settings.
Once the setup is complete, you can access the Jenkins dashboard by clicking on "Start using Jenkins."

Conclusion: Jenkins is now ready to automate your software development processes, allowing you to build, test, and deploy your applications with ease. Make sure to explore the extensive plugin ecosystem and configuration options available in Jenkins to tailor it to your specific needs. Happy automating!
If this post was helpful, please do follow. I am sharing my LinkedIn profile below, please feel free to connect.
https://www.linkedin.com/in/shubhambmatere/
Thank you for reading...see you soon..